Saturday, May 30, 2009

Spring Song Watercolouring


Here's a little snippet of the card I just uploaded to the Elite Challenges blog for the May sketch challenge. It's been a while since I have done some full-on watercolouring, and I was very keen to get some ink on my Spring Song set. The Baja background was done by picking up ink from the inkpad lid with an aquapainter, but the image was done with markers directly on to the watercolour paper and blended with the aquapainter. A few bleeds where there was a little too much water, but overall I'm quite happy with this one. Some nice bright colours for this raininy, chilly day!

Friday, May 29, 2009

Cinema Saturday #33

This week's Cinema Saturday movie was Ever After, a movie that I haven't seen too often but love. While I would have loved to have made a card based on the "Just Breathe" dress, I didn't end up with a lot of time to work on my card and I knew I couldn't do it justice (I mean, have you SEEN this dress in all it's detail? Simply stunning!) So I went with my next favourite dress, the blue one from the library scene. Due to the nature of the fabric, the colours look completely different depending on the angle of the light, but the basic colour and pattern combination reminded me of this Bella Bleu paper, so that's what I went with. I also knew there was a stamp with at least "Ever After" on it, but once I located it I decided to use the whole "Happily Ever After" as it is something that Henry says to Danielle. There are a few interesting things with this
card even though it looks simple - the frame has been stamped on Whisper White and Kraft, cut out and then layered so the stamped side is facing down. The main reason for this is that there is no Kraft ink and I wasn't happy with any other colour for this. The other interesting thing is the ribbon. I simply pulled a couple of threads at the top and bottom of some Kraft tafetta and pulled them untill I had a long enough piece of ribbon bunched up to my satisfaction. The ribbon is stuck down across the front with Sticky Strip so it would lay in a nice straight line.

All supplies by Stampin' Up!
Cardstock: Kraft, Whisper White
Stamp Set: Lots of Thoughts (retired), Frames With A Flourish
Ink: Not Quite Navy
Accessories: Pretties Kit, Kraft tafetta, mini glue dots, sticky strip
Show watched while creating: Ever After

Thursday, May 28, 2009

Keeping With The Bright

This is another card for a nephew. It must've been about a year ago now that I saw these four Sesame St characters made out of the scallop circle punch and thought "well I know what I'm doing for Rory's birthday card next year!", though I didn't think it would take me this long to get around to doing it for the first time! Each character has a scallop circle head, 1/2" circle eyes and 3/16" circle pupils and then various other punched shapes - some trimmed - to complete their look. Even though the colours aren't an exact match, my gathered supplies for the characters reminded me of this paper from the Good Morning Sunshine pack, and it worked well for the underneath layer.

All supplies by Stampin' Up!
Cardstock: Real Red, Basic Black, Summer Sun, Old Olive, Chocolate Chip, Pumpkin Pie, Brilliant Blue, Close To Cocoa, Pixie Pink (inside beak)
Stamp set: Happy Everything
Ink: Basic Black
Accessories: Scallop Circle punch, 1/2" circle punch, Crop-A-Dile (for pupils), small oval punch, 1 1/4" circle punch, 3/4" circle punch, Boho Blossoms punch (for cookie bite, double punched), Chocolate Chip marker (for the chocolate chips no less!)
Show watched while creating: Doctor Who

Wednesday, May 27, 2009

KW Colour Inspiration #53

This weeks challenge from Kristina involves some very bold colours, which I am not normally in to. But the timing was right for one of my nephew's birthday cards, and the inspiration photo helped a bit too. A few weeks back I had been walking through the newsagents and spotted a gift back with monsters/aliens all over it, and the main one that caught my eye had an oval-ish body that reminded me of the new Wide Oval punch. My phone memory was full so I couldn't snap a picture of it, and I didn't have time to take down the designer so I just had to remember the basic idea. The photo for this challenge reminded me of that, though I'm sure my little guy looks nothing like the one I saw! There's very little stamping on this card, and I even made two versions of it because I couldn't decide whether to go with the glitter or not (so I had to do both!). There may be just a few too many stars, but I was rather frustrated with my VersaMarker soaking into the cardstock so quick I couldn't even get 5 done and sprinkle the Heat & Stick powder on in time to get a significant amount to stick. Plan B was the Tombow glue.

The layout for the cards is based on Weekend Sketch Challenge #82.
All supplies by Stampin' Up!
Cardstock: Basic Black, Whisper White, Real Red
Stamp Set: On Your Birthday, All In The Family
Ink: Basic Black, Whisper White
Accessories: sponge dauber, Stampin' Pastels, Tombow Mono Multi glue, wide oval punch, 1" circle punch, 1/2" circle punch, Crop-A-Dile, Crystal Effects, Chunky Essentials glitter, 3/16" corner rounder, Square Fire Rhinestone brads, Good Morning Sunshine DSP
Show watched while creating: Doctor Who

Tuesday, May 26, 2009

Simple Birthday Greetings

It was Glenn's birthday last week, and this is the card I made for him. I did make the mistake of leaving it till the day before to make his card, so I was after something pretty quick and easy. I chose to copy a card from p120 of the SU! catalogue, although I ended up copying it more than I had intended! Initially I was working on copying just the layout, but after a bit of shuffling to make things work I ended up using very similar colours in much the same positions. The card base is textured Bashful Blue and the stars have all been coated with Crystal Effects, both adding some subtle interest. I did add a wee bit of black grosgrain: it's ribbon but it's black so it works for a guys card (Glenn at least said nothing about it... maybe he's learning? wink).

All supplies by Stampin' Up!
Cardstock: textured Bashful Blue, Brocade Blue, Whisper White, More Mustard, Riding Hood Red
Stamp set: On Your Birthday
Inks: Basic Black
Accessories: Star punch, Clips Assortment, Basic Black 1/4" grosgrain ribbon, dimensionals

Monday, May 25, 2009

New Bundle of Joy

It's probably obvious to long-time readers that Bundle of Joy was my favourite baby set. Now that it has retired I don't have an actual baby stamp, but I made sure one of the first hostess sets I got was Punches Three so I could have this "Bundle of Joy" stamp. This card is for my new nephew Karl, using a colour combination I've been dying to use since I physically laid eyes on Pacific Point. Along with the decent splash of purple on the card I sent a couple of Target royal purple suits up for him - he's my nephew he's going to have purple! The chipboard letters have been coloured using a technique picked up from convention, inking them with a dauber and reinker. I actually can't remember if the technique was demonstrated with wetting the letters first but that's what I did by brushing my Aquapainter over them first. The layout was based on WSC81.

All supplies by Stampin' Up!
Cardstock: Taken With Teal, Pacific Point, Orchid Opulence, Whisper White, Tempting Turquoise
Stamp Sets: Polka Dot, Punches Three
Inks: Taken With Teal, Pacific Point, Orchid Opulence, Tempting Turquoise
Accessories: Tempting Turquoise 1/4" grosgrain ribbon, Circle Ice Rhienstone Brads, Onboard Timeless Type, On Board Lots of Letters, dimensionals

Saturday, May 23, 2009

Yet Another Twilight Card

I couldn't help myself and ended up making another card inspired by Twilight. This time, there is no red in sight! I've based this card on Bella's bed linen, although I swapped the plain and patterned sections around so the heart wouldn't be so lost in the middle. The strips of Perfect Plum were rolled up into coils, and rolled back on themselves numerous times to get a fine wrinkle look to them (which is hard to see in the picture).

All supplies by Stampin' Up!
Cardstock: Basic Black, Perfect Plum, Pale Plum
Stamp Sets: Always, Thoughts & Prayers, Fresh Cuts
Inks: Basic Black
Accessories: Basic Black marker, dimensionals
Show watched while creating: I broke with tradition... Doctor Who.

Wednesday, May 20, 2009

Cinema Saturday #32

AKA "All In The Ballet Studio".

This week's Cinema Saturday movie is the much anticipated "Twilight". This weeks requirements were the colours red and black, and sparkle - of course!

I had this idea for a spinner card of the ballet studio scene pretty much since I started doing Twilight stuff with the All In The Family set, however it wasn't until I started working on it the other day that I thought it all through. What Alice actually does to James isn't all that obvious in the movie itself, but if you watch the extras of the 2-disc set they do show Alice completely ripping James' head off and throwing it in the fire. I knew I wouldn't be able to include Emmet and Jasper holding James' arms, as one of their heads would be obscured by the spinner and look odd. I also knew Alice would have to be on James' back instead of his front, so we could see her face. I hadn't thought of what head I would use for James, but in the end there was only one option: he has long hair it's just pulled back. So for the sake of this card we'll say Edward pulled his pony tail out during their fight lol .

As I thought about the arangement of the card, I realised there was going to be "dead space" in the bottom right, with James and Alice on the left and the spinner going along the top. It didn't take me long to realise that having Bella laying there would be perfect! Bella is bleeding Riding Hood Red from the glass chunk being imbedded into her leg, and she has some Dazzling Diamonds on her wrist from where James bit her (which isn't mentioned in the movie but I just had to include it because it amuses me!). I've also used my StazOn "marker" again, to selective ink up James' jacket, James' and Bella's heads, and Alice's dress.

Here are some "action shots" of the card.

All supplies by Stampin' Up!
Cardstock: Basic Black, Whisper White
Stamp Set: All In The Family
Inks: StazOn; Close To Cocoa and Blush Blossom for watercolouring
Accessories: Word Window punch, 3/4" punch, StazOn "marker", aquapainter, Going Gray marker, Basic Gray marker, Close To Cocoa marker, Brocade Blue marker, Basic Black marker, Chocolate Chip marker, Pacific Point "marker", Riding Hood Red "marker", 2-way glue pen, Dazzling Diamonds glitter, dimensionals, Bella Rose DSP
Show watched while creating: Twilight

More Trendy Trees and Chocolate Seahorses

This morning I've posted two new cards over at the Elite Challenges blog.
For this first one I used Trendy Trees again, and in a similar layout to the card I posted the other day. However, each tree top was cut out and shaped, as I hope you can see in the shot above. I've attached the tree tops with pop-up glue dots rather than my standard dimensionals so they will retain the rounded shape. Check out a full image of the card and all it's details at the Elite Challenges blog.

My second card ended up using a lot of glitter, and I even mixed the Chunky Sprinkles with the Fine Supernova. I filled the inside of the aluminium-edged tag with Tombow, sprinkled on some Iris Chunky Sprinkles, a little Celery Chunky Sprinkles, a few areas of Fine Turquoise and then filled the rest with Fine Olive. A little mess but quite effective! The glitter on the seahorse and seaweed (you can just see it in the bottom of the picture above) were attached using Heat & Stick powder. Check out the full card image and details over at the Elite Challenges blog.

Tuesday, May 19, 2009

May Inklings Cyberstamp Challenge 3

Aka "The Prettiest Frisbee I've Ever Seen" - at least that is what Tiarna exclaimed when she saw it! Then she realised it was attached to a card and thus not so much a functional object lol. I've made one of these before in my teabag folding days, so even though the night was getting late and I have been trying to get decent bedtimes since convention, I stayed up and made my pinwheel... then had to think what to do with it! I decided a little square card was the best bet, and with no sentiment on the front it could pass as a Christmas card with it's colouring.

All supplies by Stampin' Up!
Cardstock: Kiwi Kiss, Real Red, Pink Pirouette
Stamp set: Polka Dot
Ink: Real Red
Accessories: Raspberry Tart DSP, Fire Circle Rhinestone brads

May Inklings Cyberstamp Challenge 1, Part 2

When Lin Mei posted her first challenge for the Inklings cyberstamp, I also thought of this card which I had also made a few weeks ago but hadn't posted yet. Once again I decided that I could easily whip up another version of it with different paper, as well as finish sticking together one that was a UFO (Un-Finished Object). The card was inspired by this card by Amy, which was made ages ago but has stuck in my head as a great use of patterned paper.

All supplies by Stampin' Up!
Cardstock: Kiwi Kiss
Stamp Set: On Your Birthday
Inks: Real Red
Accessories: Raspberry Tart DSP, Flower Fusion, Flower Fusion Too, Circle Ice Rhinestone brads, Circle Fire rhinestone brads

I had made most of this one at the same time that I had made the Raspberry Tart one, but I didn't finish it straight away as I was waiting for my died Pretties flowers to dry. I colour my flowers using the markers, mainly because it's the cleanest way to colour them (not that I am against inky fingers). Even though using the markers doesn't get them as wet as some other colouring methods, with darker colours I have found it prudent to give them a long time to dry, and then a bit longer just to make sure, other wise you'll return to your project some time later and find the ink has bled into the cardstock underneath.

All supplies by Stampin' Up!
Cardstock: Not Quite Navy
Stamp Set: Thoughts & Prayers
Inks: Not Quite Navy
Accessories: Bella Bleu DSP, Pretties Kit, Flower Fusion Too

And finally, this one was completely made on the night. I am so loving the Urban Garden paper! The Basic Gray and Not Quite Navy flowers near the top were created by double punching cardstock: punch the shape once, then put the punched out shape back into the punch but rotated so it will be punched in a different place and create a brand new shape. The easiest way to do this is to attach a scrap of paper (using temporary adhesive like Dotto) to the punch so you have something to hold on to and you can position the shape much more easily. I coloured the Pretties flower on this one with my Kiwi Kiss marker, however because it was being layered on top of a darker colour I didn't worry about making sure it was dry first since any bleeding is unlikely to show.

All supplies by Stampin' Up!
Cardstock: Not Quite Navy, Basic Gray
Stamp Set: Occasional Greetings
Inks: Basic Gray
Accessories: Pretties kit, Felt Fusion Too, Clear Rhinestone brads, 5-petal flower punch, Boho Blossoms punch

Monday, May 18, 2009

KW Colour Inspiration #52

It feels like an age since I've been able to do one of Kristina's challenges. Now that things are finally settling down after Convention I took some time today to get to work on the current challenge, with such lovely colours it was hard to resist!

This card is somewhat similar to one I have been demonstrating at workshops this month. I think the Rock n Roll technique is so effective with these trees! I'm really loving this set, hope you don't get sick of seeing it on here!

All supplies by Stampin' Up!
Cardstock: So Saffron, Whisper White
Stamp set: Trendy Trees
Inks: Sahara Sand, So Saffron, More Mustard, Baja Breeze
Accessories: dimensionals

May Inklings Cyberstamp Challenge 1, Part 1

Last Monday night was the Inklings May Cyberstamp, this month hosted by the always lovely and sometimes loony Lin Mei. In light of this month's paper promotion, the first challenge she set was to create a card using predominantly paper. OK, so there is more white space than paper on this one, but the paper is the feature! I'd actually made this card a week or two before, but since I hadn't uploaded it any where I thought I'd claim it as part of this challenge. Then I decided making another one but with different paper would take that long, so I whipped up another (below).

All supplies by Stampin' Up!
Cardstock: Whisper White, Basic Gray
Stamp Sets: Trendy Trees
Inks: Not Quite Navy
Accessories: Urban Garden DSP

All supplies by Stampin' Up!
Cardstock: Whisper White, Real Red
Stamp Set: Trendy Trees
Inks: Cameo Coral
Accessories: Raspberry Tart DSP

Sunday, May 17, 2009

The Card That Started It All

This card was made weeks ago, for Taylor's sketch challenge #64, but I kept it under wraps because I very quickly decided that I had to use these elements again for convention swaps and didn't want to spoil the surprise. You may notice a lot of white flecks on the card: that's not white embossing powder or anything like that, it's just dust and fluff that collected on the card over the weeks it sat here waiting to be photographed and a quick brush didn't get them off (I was in a rush as I needed to attend to dinner!). The main image is the Bloomin' With Beauty flower stamped on Whisper White and cut out just as I did for the bookmark swaps (though the others are coloured much nicer). The black strip across the middle has Bella's Border embossed in black just as I did for the "Bella & Edward/Jacob" cards, although here I did it twice (turning the wheel around the second time and trying to get a mirror image effect but I didn't quite line it up perfectly). The sentiment comes from yet another set, A Beautiful Thing, which I inked with my Basic Black, Riding Hood Red and Garden Green markers. I was quite happy with how this turned out!

All supplies by Stampin' Up!
Cardstock: Riding Hood Red, Basic Black, Garden Green, Whisper White
Stamp Sets: Bloomin' With Beauty, Bella's Border, A Beautiful Thing, Frames With A Flourish
Inks: StazOn Jet Black, VersaMark
Accessories: Basic Black marker, Riding Hood Red "marker", Garden Green marker, Dress Up Ribbon Originals, aquapainter, dimensionals
Show watched while creating: Twilight

Convention Swaps Part V

One last convention related post and then I have other things to catch you up on (which shouldn't take as long now that I have everything photographed!). This wasn't technically a swap, but I did make three of these kusudama balls while away and gave them to three people who have all been issued the challenge to make one themselves. Sadly, Kari hasn't managed to get further than one petal, and that's since before Christmas! Initially Karen and Keesh were given a 12 day challenge but since we have all been so busy since convention I've relented and am giving them a bit longer... but don't get too cozy in that reprevie ladies!
This kusudama has been made using 2" squares of paper from the Baja Breeze Patterns paper pack, though the ones I made for convention were made with Pink Pirouette Patterns paper. This is also a different fold to what I posted before, let alone this one only taking 24 squares (as compared to 60 for the other one), it's much quicker to make (I had my first one completely done in 2 1/2 hours).

All supplies by Stampin' Up!
Cardstock: none
Stamps: none
Inks: none
Accessories: Baja Breeze Patterns paper, Tombow Mono Multi adhesive, Whisper White taffeta ribbon
Shows watched while creating: Bones, Fringe

Wednesday, May 13, 2009

Convention Swaps Part IV

This is actually the first card I did as a convention swap but I've ended up showing them all out of order... because I had to show you the Twilight ones first! This one was a bit of a lazy one too, because I had initially designed it for a "Card in a Box" for the Inklings team meeting a few weeks before. I made 20 of these, and was running out of Artichoke brads so created two other colour combinations (I even worked out another 2 colour combinations but never got around to making them). The Artichoke one was the only one that used Vanilla cardstock, so was the only one that I went over the white stitching of the ribbon with a Sahara Sand marker (so the white stitching didn't look so odd beside the Vanilla cardstock).

All supplies by Stampin' Up!
Cardstock: Kraft, Always Artichoke, Very Vanilla
Stamp sets: Noone Like You Simply Sent kit, Bella's Border
Inks: Always Artichoke, VersaMark
Accessories: Baja Breeze double stitched ribbon, Rich Regals brads, Sahara Sand marker, Eyelet border punch
Show watched while creating: there was definately some Twilight, but the rest I have forgotten now
All supplies by Stampin' Up!
Cardstock: Kraft, Brocade Blue, Whisper White
Stamp sets: Noone Like You Simply Sent kit, Bella's Border
Inks: Brocade Blue, VersaMark
Accessories: Bashful Blue double stitched ribbon, Rich Regals brads, Eyelet border punch
Show watched while creating: there was definately some Twilight, but the rest I have forgotten now
All supplies by Stampin' Up!
Cardstock: Kraft, So Saffron, Very Vanilla
Stamp sets: Noone Like You Simply Sent kit, Bella's Border
Inks: So Saffron, Chocolate Chip, VersaMark
Accessories: Chocolate Chip double stitched ribbon, Rich Regals brads, Eyelet border punch
Show watched while creating: there was definately some Twilight, and I remember some Bones but the rest I have forgotten now

Tuesday, May 12, 2009

Convention Swaps Part III

Leading up to convention, my daughter Shaelea recieved a birthday invitation for a party on the Sunday while I was away... so I couldn't leave the card to do the night before! I asked Shaelea what card she'd like to give and this is what she came up with... simple yet cute, so I decided to make some more for Convention swaps. My girls call this little guy Chubby Owl, I think he's their favourite stamp in the entire catalogue (beat that Sock Monkey!)

All supplies by Stampin' Up!
Cardstock: Pale Plum, Chocolate Chip, Whisper White, Perfect Plum
Stamp Set: Owl Together Now
Ink: StazOn Jet Black; Perfect Plum, Pale Plum, Kiwi Kiss, Chocolate Chip for watercolouring
Accessories: Almost Amethyst marker, So Saffron marker, scallop circle punch, 1 3/8" circle punch, 1 1/4" circle punch, aquapainter, blender pen, dimensionals
Show watched wile creating: Twilight

Friday, May 08, 2009

All In The Cullens

Technically this wasn't a swap... I whipped this up the night before I headed off (when I should have been packing) because I just had to commit this idea to cardstock, so I took it to show off and tease lol. People who haven't seent he movie Twilight may not get a lot of the details I included, and I also made Alice shorter as she is described in the book, but here are the Cullens Australia style - maybe they're even playing beach cricket! To make some of the bodies I decided I had to make myself a StazOn marker (made the same way as an In Color marker, though I gave an extra day to dry just to be safe), because trying to ink some of those bits with the corner of a StazOn inkpad was going to be tricky if not impossible (and extrememly frustrating!). I was very chuffed with myself when I found the marker worked so well, I can't wait to use it on other things.

All supplies by Stampin' Up!
Cardstock: Real Red, Basic Black, Whisper White
Stamp Set: All In The Family, Bella's Border
Inks: VersaMark, StazOn Jet Black; Blush Blossom (for water colouring)
Accessories: StazOn "marker", Aquapainter, Sahara Sand marker, Going Gray marker, Basic Gray marker, blender pen, Encore silver ink refill (for Alice's shoes), Basic Black marker, Night of Navy marker, Chocolate Chip marker, Lovely Lilac marker, Elegant Eggplant marker, Really Rust marker, Baja Breeze "marker", Pacific Point "marker", So Saffron marker, Bashful Blue marker, Brocade Blue marker, Creamy Caramel marker, More Mustard marker, Crop-a-dile (for cricket ball), 2-way glue pen, Dazzling Diamonds glitter
Show watched while creating: Twilight

Wednesday, May 06, 2009

Convention Swaps Part II

Are you ready for more Twilight swaps? Anyone would think I'd gone to a Twilight convention!
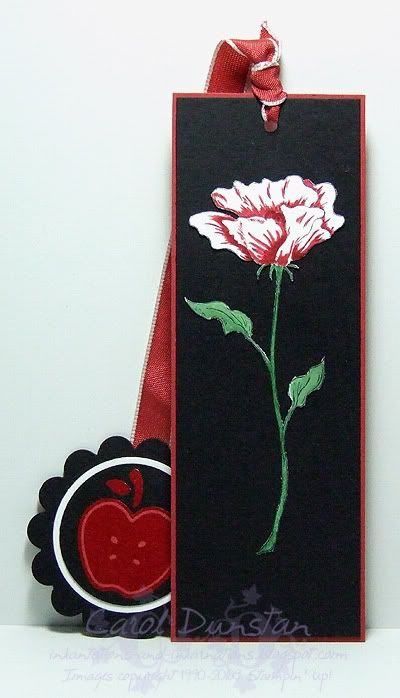
Above you can see my "Team Edward" card, for the fans of Edward. I've used All In The Family to make Edward and Bella all ready for the prom... but I had to toss the apple in there too! Normally I'm not a fan of colouring on Whisper White with markers, but it worked so well on my practise piece that I just went ahead and did it for the rest. I used Baja Breeze for Edwards shirt and Pacific Point for Bella's dress (don't forget, you can read about how to make an In Color marker here). Of course, since the Twilight vampires sparkle in the sun, I had to give Edward's face a coating of Dazzling Diamonds.
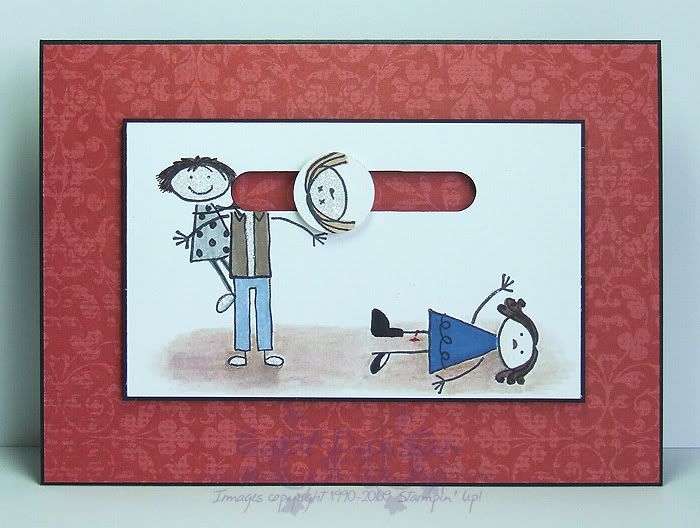
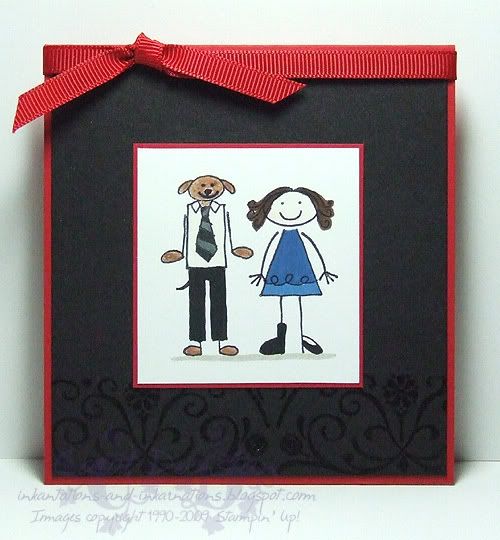
This is my "Team Jacob" card, for those Jacob fans out there. It is mentioned in the book and movie that the legend of his tribe is that they are decended from wolves, and I was all set to use the long-haired head for Jacob, but as soon as I got the idea of using the dogs head I couldn't stop giggling and had to go with it! I then realised I had to give him paws instead of hands, so I individually inked the legs from one of the legs stamps and used those. Inking the head was rather tricky, which is why I later went over the eyes, nose and mouth with a marker. You can thank Tiarna for giving me the idea to give Jacob a tail (which was supposed to be stamped but I forgot to do it before he was all coloured in and didn't want to stuff it up then, so just drew it in).

And did you notice? I used Bella's Border on them! I've thought for a long time that if I ever did make a Twilight inspired card I would have to use that on it, due to the name. I used this on the sketch card too, which I will share with you later (have to photograph it first).

All supplies by Stampin' Up!
Cardstock: Real Red, Basic Black, Whisper White
Stamp Set: All In The Family, Bella's Border
Inks: VersaMark, StazOn Jet Black; Blush Blossom (for water colouring)
Accessories: Aquapainter, Basic Black marker, Chocolate Chip marker, Sahara Sand marker, Pacific Point "marker", Really Rust marker, Baja Breeze "marker", Crop-a-dile (for apple), Real Red 1/4" grosgrain ribbon, 2-way glue pen, Dazzling Diamonds glitter, Basic Gray marker, Really Rust and Close To Cocoa Watercolor Wonder Crayons
Show watched while creating: Twilight

Tuesday, May 05, 2009

Convention Swaps Part I

Caroline was correct, the inspiration for this piece was Twilight. I actually got the idea for the flower while working on a sketch challenge last week and loved how it turned out so much I decided to make it for a swap. The flower was stamped in StazOn on Whisper White cardstock then watercoloured with the aquapainter picking up ink from the lids of the inkpads, and then the flower was cut out. The apple was clear embossed on Riding Hood Red cardstock, punched out, and then I went around the outside twice with a Basic Black marker. You need to go over the black a second time to get it really black. I loved how these turned out, they came up better than I had imagined... but I am sure the non-Twilighters that swapped with me were thinking "what's an apple got to do with the flower???"

All supplies by Stampin' Up!
Cardstock: Riding Hood Red, Basic Black, Whisper White
Stamp Sets: Bloomin’ With Beauty, Tart & Tangy
Inks: StazOn Jet Black, VersaMark; Riding Hood Red, Garden Green for watercolouring
Accessories: Aquapainter, Riding Hood Red taffeta ribbon, scallop circle punch, 1 3/8” circle punch, 1 ¼” circle punch, clear embossing powder, Basic Black marker
Show watched while creating: Twilight

Friday, May 01, 2009

How do you like these apples?

This is just part of one of my swaps. Readers of a certain book series, or watchers of a certain movie, will probably guess the inspiration wink. Full details and pictures in a few days!