 I needed a birthday card for a little boy, so I decided to play with this "Fishy Friends" octopus again. And I just so happened to have this piece of aqua cardstock that I had run through the Cuttlebug in the swirls embossing folder, so I teamed them up. The octopus was stamped on Whisper White with StazOn Jet Black and coloured with water colour pencils and an aqua painter. The 'Happy Birthday' is an Amazing Creations stamp of my sisters that I had stamped out a few images of on one of her visits. It's a great little stamp, but sadly the company has closed so it will be difficult to track it down. I finished both these pieces off with a bit of watercolouring on the edge (which doesn't show up well in the photo) and with a few spots of Kindy Glitz (in Aqua and Lime). These were mounted on some light blue cardstock (Prisma I think) and are popped up on the cardfront with double-sided foam tape. The 's' clip is by Birch and was a great colour match, but very stiff and hard to push the spirals out a little bit so the cardstock didn't get bent quite so much. The base cardstock is the same Prisma light blue, with a layer of Prisma lime green and the embossed aqua layer.

Showing posts with label Cuttlebug. Show all posts
Showing posts with label Cuttlebug. Show all posts
Tuesday, March 20, 2007
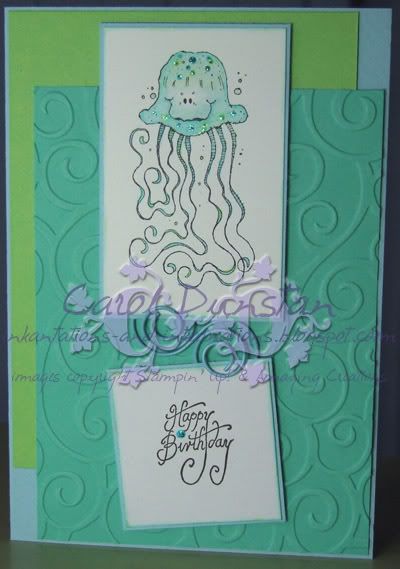
Birthday Octopus
I needed a birthday card for a little boy, so I decided to play with this "Fishy Friends" octopus again. And I just so happened to have this piece of aqua cardstock that I had run through the Cuttlebug in the swirls embossing folder, so I teamed them up. The octopus was stamped on Whisper White with StazOn Jet Black and coloured with water colour pencils and an aqua painter. The 'Happy Birthday' is an Amazing Creations stamp of my sisters that I had stamped out a few images of on one of her visits. It's a great little stamp, but sadly the company has closed so it will be difficult to track it down. I finished both these pieces off with a bit of watercolouring on the edge (which doesn't show up well in the photo) and with a few spots of Kindy Glitz (in Aqua and Lime). These were mounted on some light blue cardstock (Prisma I think) and are popped up on the cardfront with double-sided foam tape. The 's' clip is by Birch and was a great colour match, but very stiff and hard to push the spirals out a little bit so the cardstock didn't get bent quite so much. The base cardstock is the same Prisma light blue, with a layer of Prisma lime green and the embossed aqua layer.
Monday, March 19, 2007
Again with the Cuttlebug!
Pretty simple, but how could I cover up that embossing???
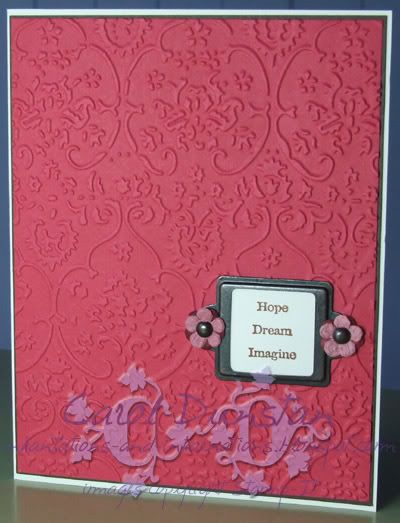 This is another card I put together on the weekend. I think the textile embossing folder is my favourite from the current range, and felt some hodge podge would be a very fitting match. The little sentiment stamp is from Stamp-It, inked with a combination of Stampin' Up! Chocolate Chip and VersaFine Sepia (inking with the Choc Chip first, stamping off onto scrap paper, then inking with the Sepia). I had to have quite a play to figure out a brown that would match the layer of scrap cardstock the embossed background is mounted on. The sentiment and card base are a Prism cream cardstock. I added a few Prima's each side of the Aged Copper hodge podge frame to pretty it up without covering much of the embossing.
This is another card I put together on the weekend. I think the textile embossing folder is my favourite from the current range, and felt some hodge podge would be a very fitting match. The little sentiment stamp is from Stamp-It, inked with a combination of Stampin' Up! Chocolate Chip and VersaFine Sepia (inking with the Choc Chip first, stamping off onto scrap paper, then inking with the Sepia). I had to have quite a play to figure out a brown that would match the layer of scrap cardstock the embossed background is mounted on. The sentiment and card base are a Prism cream cardstock. I added a few Prima's each side of the Aged Copper hodge podge frame to pretty it up without covering much of the embossing.
Sunday, March 18, 2007
Bright Art of Life
I've managed to play a bit over the last few day, using some more of my Cuttlebug embossed pieces and going back to some non-SU! things.
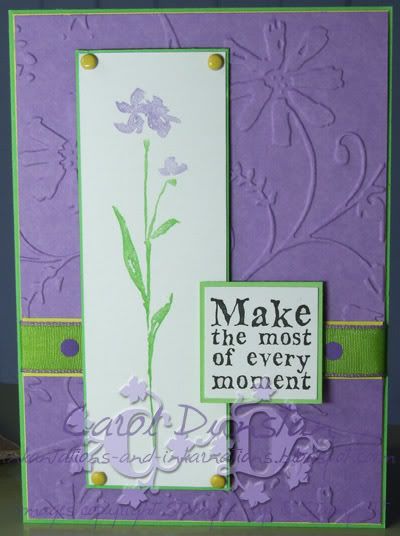 For this card I started with little in mind of where I wanted it to end up, and I'm pretty pleased with the result. I inked the flower from the retiring Art of Life hostess set using my Gable Green and Lovely Lilac markers and stamped on a scrap of white cardstock that was the perfect size. I decided for this card I wanted the embossed background to seem to cover the whole cardfront, so I slashed it about two thirds of the way down and decided I would cover the 'gap' with some ribbon. This green with purple spots ribbon (which I think was from Scrapapple) was a good match, but not quite wide enough, so I layered it over some yellow cardstock. The background is also layered on a layer of the same yellow. I stamped the sentiment (by Stamp-It) using VersaFine on more scrap white and punched it out with a 1 1/4" square punch, then layered both white layers on the same green as the base card. I didn't have any yellow brads that were a perfect match, but their location is far enough away from the yellow cardstock that these Bazzill brads look pretty close. The flower was mounted onto the cardfront using some double-sided foam tape (which is actually industrial strength stuff Glenn brought home from work), and the sentiment was mounted using Magic Mount, which was slightly thicker than the foam tape to stager the layers nicely.
For this card I started with little in mind of where I wanted it to end up, and I'm pretty pleased with the result. I inked the flower from the retiring Art of Life hostess set using my Gable Green and Lovely Lilac markers and stamped on a scrap of white cardstock that was the perfect size. I decided for this card I wanted the embossed background to seem to cover the whole cardfront, so I slashed it about two thirds of the way down and decided I would cover the 'gap' with some ribbon. This green with purple spots ribbon (which I think was from Scrapapple) was a good match, but not quite wide enough, so I layered it over some yellow cardstock. The background is also layered on a layer of the same yellow. I stamped the sentiment (by Stamp-It) using VersaFine on more scrap white and punched it out with a 1 1/4" square punch, then layered both white layers on the same green as the base card. I didn't have any yellow brads that were a perfect match, but their location is far enough away from the yellow cardstock that these Bazzill brads look pretty close. The flower was mounted onto the cardfront using some double-sided foam tape (which is actually industrial strength stuff Glenn brought home from work), and the sentiment was mounted using Magic Mount, which was slightly thicker than the foam tape to stager the layers nicely.
Friday, March 16, 2007
Getting 'buggy with it
My first Cuttlebug card:
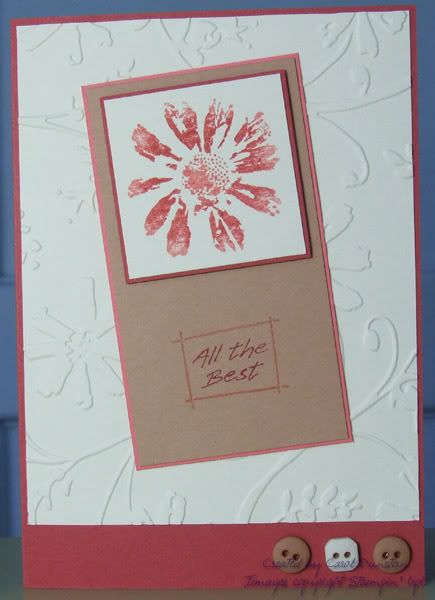 I thought the full 'Petal Prints' daisy was a good match for the flowers on the Stylised Flower embossing folder. Both the daisy and the sentiment (from the "All the Best" set) were inked with Cameo Coral and Ruby Red markers. The daisy was stamped on some cream cardstock that was in my scraps drawer (which I first used for the embossed background), the sentiment stamped on Creamy Caramel. I mounted the daisy onto some Ruby Red, then mounted that onto the Creamy Caramel using some double-sided foam tape. All this is layered on Cameo Coral and then onto the embossed background, which is mounted on a Ruby Red base card. Down the bottom I added three buttons from the Earth Elements/Neutrals button collection, attached to the card using mini glue dots.
I thought the full 'Petal Prints' daisy was a good match for the flowers on the Stylised Flower embossing folder. Both the daisy and the sentiment (from the "All the Best" set) were inked with Cameo Coral and Ruby Red markers. The daisy was stamped on some cream cardstock that was in my scraps drawer (which I first used for the embossed background), the sentiment stamped on Creamy Caramel. I mounted the daisy onto some Ruby Red, then mounted that onto the Creamy Caramel using some double-sided foam tape. All this is layered on Cameo Coral and then onto the embossed background, which is mounted on a Ruby Red base card. Down the bottom I added three buttons from the Earth Elements/Neutrals button collection, attached to the card using mini glue dots.
Thursday, March 15, 2007
think I caught a 'bug
I seem to have come down with something quite contagious. Cuttlebugitis. I think it is best if I get off the computer and see if I can work through the fever...


Subscribe to:
Posts (Atom)