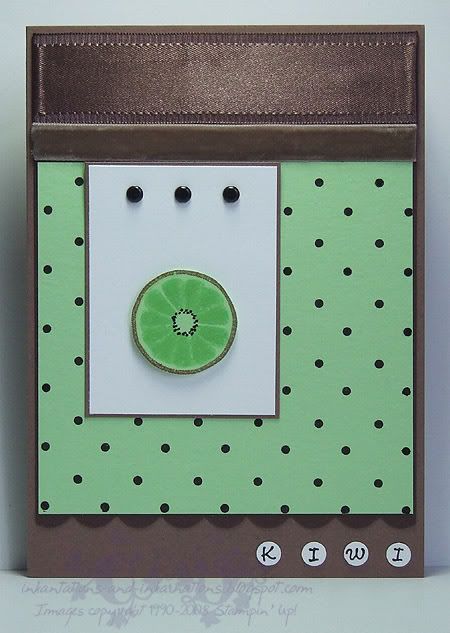
This is another one of those ideas I have had floating around in my head for ages before I did much about it. When I say idea, I'm refering to the kiwi fruit, not the whole card design. And quite frankly, it is only fitting that I didn't make this card till now (well, technically yesterday, but who's counting). You see, when I first got Tart & Tangy, I had a bit of a play, and somehow came up with the idea of making a kiwi fruit with the citrus stamp. I even perfected the colours (a Certainly Celery kiwi fruit is nowhere near as appetising). But I never went beyond that... it sat languishing in the "to do" pile in the back of my head. This week I finally caught up on my swaps, had no other commitments, and nothing else in the "to do" pile that was raising it's hand higher.
And then I went shopping.
And I finally found the cinnamon Lindt balls my sister had been raving about (with good reason).
And I got myself a pack of peanut butter Lindt balls too (and a second silver lantern with the cinnamon Lindt balls for good measure).
And then I came across Whittaker's Kiwi Chocolate.
I'd love to give you a link for it, and the cinnamon Lindt balls, and the peanut butter Lindt balls... but all their websites are pretty woeful really. And I'm woeful too because I forgot to photograph the chocolate as I photographed the card. But I will tell you I found the Lindt balls in Target (Charlestown Square store to be precise) and the kiwi fruit choc in Big W (also Charlestown Square).
Oh - and we are playing NZ in the cricket at the moment (I'd love to make some witty comment about eatting the kiwis but we aren't going as good as we should in the cricket), we're playing them in the rugby league world cup tomorrow and I am sure there was some other sporting event between the two nations soon. Oh well, those were enough signs for me to realise I had to make this card yesterday... and
Julee's Mojo sketch for the week worked in nicely (with a few adjustments of course - it is rare for me to follow a sketch to the pixel).
So here we have it... the Tart & Tangy citrus image inked in Gable Green, ink removed from the "peel" with a cotton bud before inking it with my Close To Cocoa marker, then reinking with the Green, removing the peel ink again and stamping over the top of the original impression, but rotating the cardstock a little. I then added the seeds with my Basic Black marker and cut it out. The background is larger black seeds (I mean Polka Dots) stamped in Basic Black ink, and I just had to use the velvetty Close to Cocoa ribbon for the hairy kiwi skin. The segments are a little more distinct on this one than my practise, which makes me think that I had forgotten that I'd stamped off first with the practise, but I think this works well enough.
All supplies by Stampin' Up!Cardstock: Close To Cocoa, Chocolate Chip, Gable Green, Whisper WhiteStamp Sets: Tart & Tangy, Polka Dot, AlphabitsInks: Basic Black, Gable GreenAccessories: 1/4" circle punch, 3/16" corner rounder, Theater Ribbon Originals, Vintage brads, Basic Black marker, Close to Cocoa marker, dimensionalsShows watched while creating: Aus v NZ test cricket, Bones, Heroes

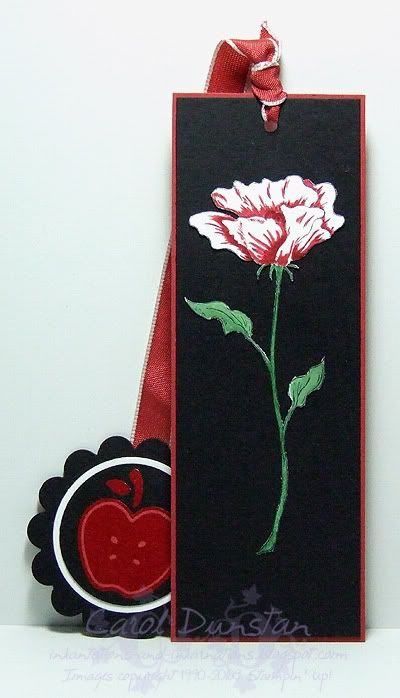 Caroline was correct, the inspiration for this piece was Twilight. I actually got the idea for the flower while working on a sketch challenge last week and loved how it turned out so much I decided to make it for a swap. The flower was stamped in StazOn on Whisper White cardstock then watercoloured with the aquapainter picking up ink from the lids of the inkpads, and then the flower was cut out. The apple was clear embossed on Riding Hood Red cardstock, punched out, and then I went around the outside twice with a Basic Black marker. You need to go over the black a second time to get it really black. I loved how these turned out, they came up better than I had imagined... but I am sure the non-Twilighters that swapped with me were thinking "what's an apple got to do with the flower???"

 . Full details and pictures in a few days!